Sync Client V2
The Sync Client can be used to transfer all updates on contacts to an SQL database or a web service.
Activation
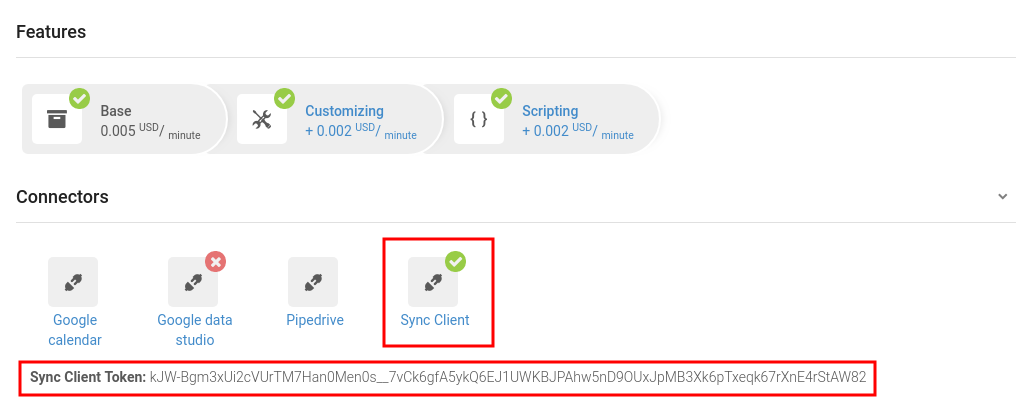
To use the Sync Client, activate the corresponding connector in the campaign settings.
After successful activation, a token is displayed below the connectors. This token is required to use the client.
The token is only visible to the user who activated the connector.

Installation
Download the Latest Version of the Binary
Download and Compile Source Code
Install Git:
sudo apt-get install git
Install Google Go:
sudo apt-get install golang-go
For the next steps, ensure that the environment variable GOPATH is set.
A description of how to set GOPATH can be found here.
Clone the repository:
go get bitbucket.org/modima/dbsync2
Install all dependencies:
cd $GOPATH/src/bitbucket.org/modima/dbsync && godep restore
Compile the Source Code
- Target platform Linux:
cd $GOPATH/src/bitbucket.org/modima/dbsync2/ && go build - Target platform Windows:
cd $GOPATH/src/bitbucket.org/modima/dbsync2/ && GOOS=windows GOARCH=amd64 go build -o dbsync2.exe - Target platform Mac:
cd $GOPATH/src/bitbucket.org/modima/dbsync2/ && GOOS=darwin GOARCH=amd64 go build -o dbsync2_mac
Docker Compose Deployment
For users who prefer containerized deployment, a pre-configured docker-compose.yml is provided. This file supports all modes (PostgreSQL, MySQL/MariaDB, SQL Server, and Webhook) so that you can run dbsync2 without modifying any source code—just update a single .env file.
Prerequisites
- Docker installed
- Docker Compose installed
Configuration
Create a .env file in the same directory as your docker-compose.yml with the following content (adjust values as needed):
# Campaign settings
CAMPAIGN_ID=my_campaign_id
CAMPAIGN_TOKEN=my_campaign_token

# PostgreSQL settings
POSTGRES_DB=mydb
POSTGRES_USER=myuser
POSTGRES_PASSWORD=mypassword

# MySQL settings
MYSQL_DB=mydb
MYSQL_USER=myuser
MYSQL_PASSWORD=mypassword
MYSQL_ROOT_PASSWORD=myrootpassword

# SQL Server settings
SA_PASSWORD=YourStrong!Passw0rd
SQLSERVER_DB=mydb

# Webhook settings
WEBHOOK_URL=https://example.com/api/transactions/
docker-compose.yml
Below is a sample docker-compose.yml file that uses our Docker Hub image (dialfire/dbsync2:latest) and reads all connection details from the .env file:
version: "3.8"

services:
  #############################
  # PostgreSQL Example
  #############################
  postgres:
    image: postgres:16
    container_name: postgres_sync
    restart: unless-stopped
    environment:
      POSTGRES_DB: ${POSTGRES_DB:-mydb}
      POSTGRES_USER: ${POSTGRES_USER:-myuser}
      POSTGRES_PASSWORD: ${POSTGRES_PASSWORD:-mypassword}
      PGDATA: /var/lib/postgresql/data/pgdata
    volumes:
      - ./data/postgres:/var/lib/postgresql/data
    ports:
      - "5432:5432"

  dbsync2_postgres:
    image: dialfire/dbsync2:latest
    container_name: dbsync2_postgres
    restart: unless-stopped
    depends_on:
      - postgres
    environment:
      CAMPAIGN_ID: ${CAMPAIGN_ID}
      CAMPAIGN_TOKEN: ${CAMPAIGN_TOKEN}
      POSTGRES_USER: ${POSTGRES_USER:-myuser}
      POSTGRES_PASSWORD: ${POSTGRES_PASSWORD:-mypassword}
      POSTGRES_DB: ${POSTGRES_DB:-mydb}
    command: >
      dbsync2 --a db_sync --c ${CAMPAIGN_ID} --ct ${CAMPAIGN_TOKEN} --url postgres://${POSTGRES_USER}:${POSTGRES_PASSWORD}@postgres:5432/${POSTGRES_DB}?sslmode=disable

  #############################
  # MySQL/MariaDB Example
  #############################
  mysql:
    image: mysql:8
    container_name: mysql_sync
    restart: unless-stopped
    environment:
      MYSQL_DATABASE: ${MYSQL_DB:-mydb}
      MYSQL_USER: ${MYSQL_USER:-myuser}
      MYSQL_PASSWORD: ${MYSQL_PASSWORD:-mypassword}
      MYSQL_ROOT_PASSWORD: ${MYSQL_ROOT_PASSWORD:-rootpassword}
    volumes:
      - ./data/mysql:/var/lib/mysql
    ports:
      - "3306:3306"

  dbsync2_mysql:
    image: dialfire/dbsync2:latest
    container_name: dbsync2_mysql
    restart: unless-stopped
    depends_on:
      - mysql
    environment:
      CAMPAIGN_ID: ${CAMPAIGN_ID}
      CAMPAIGN_TOKEN: ${CAMPAIGN_TOKEN}
      MYSQL_USER: ${MYSQL_USER:-myuser}
      MYSQL_PASSWORD: ${MYSQL_PASSWORD:-mypassword}
      MYSQL_DB: ${MYSQL_DB:-mydb}
    command: >
      dbsync2 --a db_sync --c ${CAMPAIGN_ID} --ct ${CAMPAIGN_TOKEN} --url mysql://${MYSQL_USER}:${MYSQL_PASSWORD}@mysql:3306/${MYSQL_DB}?useSSL=false

  #############################
  # SQL Server Example
  #############################
  sqlserver:
    image: mcr.microsoft.com/mssql/server:2019-latest
    container_name: sqlserver_sync
    restart: unless-stopped
    environment:
      SA_PASSWORD: ${SA_PASSWORD:-YourStrong!Passw0rd}
      ACCEPT_EULA: "Y"
      MSSQL_PID: "Developer"
    ports:
      - "1433:1433"

  dbsync2_sqlserver:
    image: dialfire/dbsync2:latest
    container_name: dbsync2_sqlserver
    restart: unless-stopped
    depends_on:
      - sqlserver
    environment:
      CAMPAIGN_ID: ${CAMPAIGN_ID}
      CAMPAIGN_TOKEN: ${CAMPAIGN_TOKEN}
      SA_PASSWORD: ${SA_PASSWORD:-YourStrong!Passw0rd}
      SQLSERVER_DB: ${SQLSERVER_DB:-mydb}
    command: >
      dbsync2 --a db_sync --c ${CAMPAIGN_ID} --ct ${CAMPAIGN_TOKEN} --url sqlserver://sa:${SA_PASSWORD}@sqlserver:1433/${SQLSERVER_DB}

  #############################
  # Webhook Example
  #############################
  dbsync2_webhook:
    image: dialfire/dbsync2:latest
    container_name: dbsync2_webhook
    restart: unless-stopped
    environment:
      CAMPAIGN_ID: ${CAMPAIGN_ID}
      CAMPAIGN_TOKEN: ${CAMPAIGN_TOKEN}
      WEBHOOK_URL: ${WEBHOOK_URL:-https://example.com/api/transactions/}
    command: >
      dbsync2 --a webhook --c ${CAMPAIGN_ID} --ct ${CAMPAIGN_TOKEN} --url ${WEBHOOK_URL}

networks:
  default: {}
Running via Docker Compose
Once your .env file and docker-compose.yml are configured, simply run:
docker-compose up -d
Docker Compose will pull the pre-built dialfire/dbsync2:latest image and start all services as configured.
How It Works
All updates on contacts are loaded every minute and then transferred directly to the configured web service or SQL database (see Usage).
Usage
SQL Database
The client supports the following database systems:
- MySQL / MariaDB
- PostgreSQL
- Microsoft SQL Server
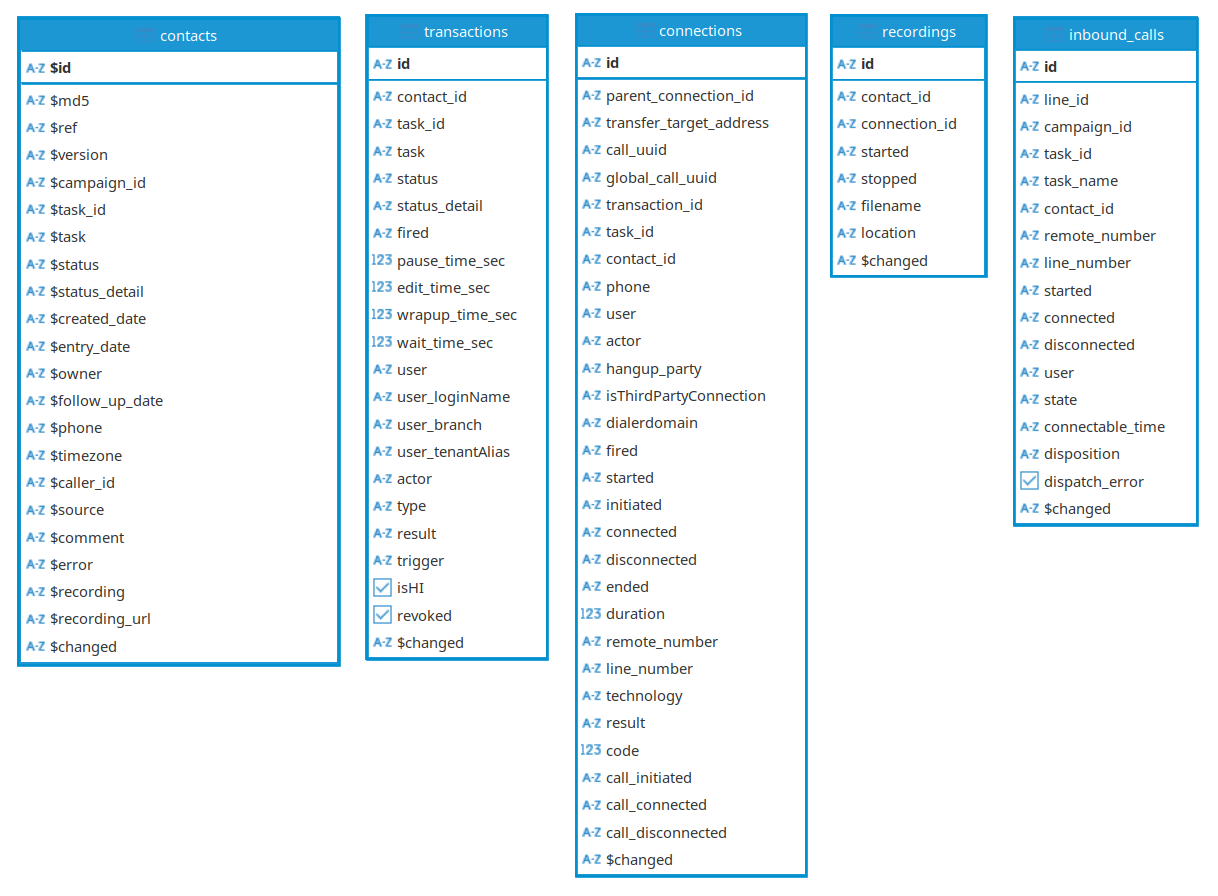
Before using the client, ensure that the corresponding database has been created. The client then creates the following tables in that database:
- contacts
Contains all $ fields and the first 100 custom fields of the campaign. - transactions
Contains all transactions along with the foreign key contact_id referencing the corresponding contact. - connections
Contains all connections for transactions, with the foreign key transaction_id. - recordings
Contains all call recordings associated with connections, with the foreign key connection_id. - inbound_calls
Contains all inbound calls with the foreign key contact_id.

Database Connection URL Schema
MySQL / MariaDB:
mysql://username:password@localhost:3306/database?useSSL=false
PostgreSQL:
postgres://username:password@localhost:5432/database?sslmode=disable
Microsoft SQL Server:
sqlserver://username:password@localhost:1433/instance/database
Example
Transfer all transactions from 01 February 2018 in campaign MY_CAMPAIGN to a local Microsoft SQL Server instance, filtering for updates with prefixes 'fc_' or 'qc_' that were performed by a user:
dbsync2 --a db_sync --fm hi_updates_only --fp 'fc_,qc_' --c MY_CAMPAIGN_ID --ct MY_CAMPAIGN_TOKEN --s 2018-02-01 --url sqlserver://my_user:my_password@localhost:1433/my_database
Web Service
Alternatively, transactions can be forwarded to a web service.
The web service must accept POST requests and respond with a status code between 200 and 299 upon success (or else the data is resent, up to 10 attempts).
The payload is sent in JSON format:
{
    "contact": ...,
    "transaction": ...,
    "state": ...
}
- contact: Contains contact details.
- transaction: Contains the corresponding transaction.
- state:
newfor a new transactionupdatedwhen a transaction is updated (e.g., connection data is added later).
Example
Forward all future transactions in campaign MY_CAMPAIGN to a web service:
./dbsync2 --a webhook --c MY_CAMPAIGN_ID --ct MY_CAMPAIGN_TOKEN --url 'https://example.com/api/transactions/'
(Error) Protocol
- All error messages are written directly to the console (stdout).
- All log messages are written to:
/var/log/dbsync/{MY_CAMPAIGN_ID}_{MODE}_{TIMESTAMP}.log - If
/var/log/is locked, logs appear under:
$HOME/.dbsync/logs/{MY_CAMPAIGN_ID}_{MODE}_{TIMESTAMP}.log
Command Line Options
An overview of all options can be obtained by running:
dbsync2 --help